
Payment API 102: Managing User Accounts with Chimoney's API
Introduction
The Chimoney API's Account Endpoints allow for the management of user accounts and transactions, from retrieving transaction details to transferring funds between accounts. These endpoints are essential for verifying transaction status, ensuring record accuracy, and resolving disputes in transactions, which ultimately enhances customer support and financial management. Additionally, they facilitate user interaction through public profile retrieval, allowing users to share their social and payment links.
This article will guide you through using the Chimoney API's Account Endpoints to manage user accounts and transactions. You'll learn how to retrieve transaction details, transfer funds, and handle other essential operations to enhance customer support and financial management in your application.
Prerequisites
Before we begin, ensure you have the following:
- A Chimoney developer account
- Your API key from the Chimoney Developer Portal
- Node.js installed on your machine
- Axios library installed in your project
If you haven't set up your Chimoney developer account yet, refer to our previous article on how to get started with the Chimoney API.
Introduction to the Account Endpoints
The Account Endpoints are designed to handle various operations related to user accounts and transactions. Here’s a brief overview of the Account Endpoints:
- Get Transaction Details by issueID: Retrieves the details of a specific transaction using its unique identifier.
- Get Public Profile of a Chimoney User: Fetches the public profile information of a Chimoney user. Example of a user profile
- Get All Transactions by Account: Retrieves all transactions associated with a specific account.
- Get Single Transaction Detail: Retrieves the details of a single transaction.
- Account Transfer: Transfers funds from one account to another.
- Delete an Unpaid Transaction: Deletes an unpaid transaction.
Integrating the Endpoints
In this section, we will explore how to integrate each of the Chimoney API's Account Endpoints into your application.
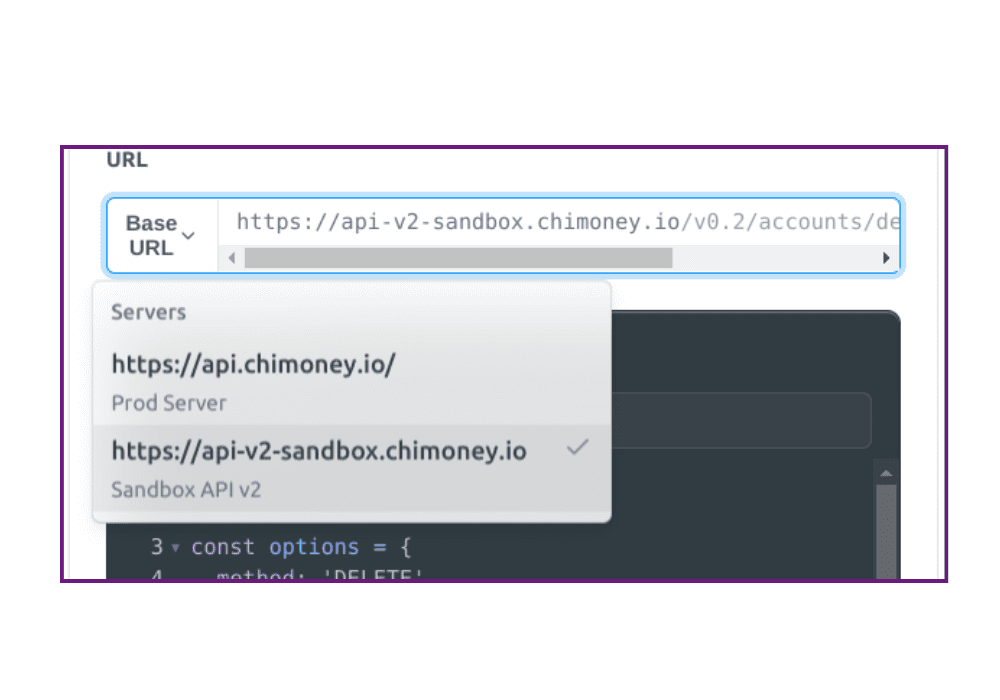
Note: Ensure you are calling the correct endpoint URL (sandbox or production). If you encounter issues, kindly verify that the appropriate endpoint is being used.
1. Get Transaction Details by issueID
Endpoint: POST /v0.2/accounts/issue-id-transactions
This endpoint allows you to retrieve the details of a specific transaction using its issueID. This is particularly useful when you need to verify the status or details of a transaction after it has been initiated.
Application
- Verify the details of a transaction to ensure it was processed correctly.
- Assist customer support in resolving queries related to specific transactions.
Before we get started, you need to have an issueID. To get it you can initiate a test payout by following these steps:
- Visit the payout chimoney endpoint in the Chimoney API Documentation here.
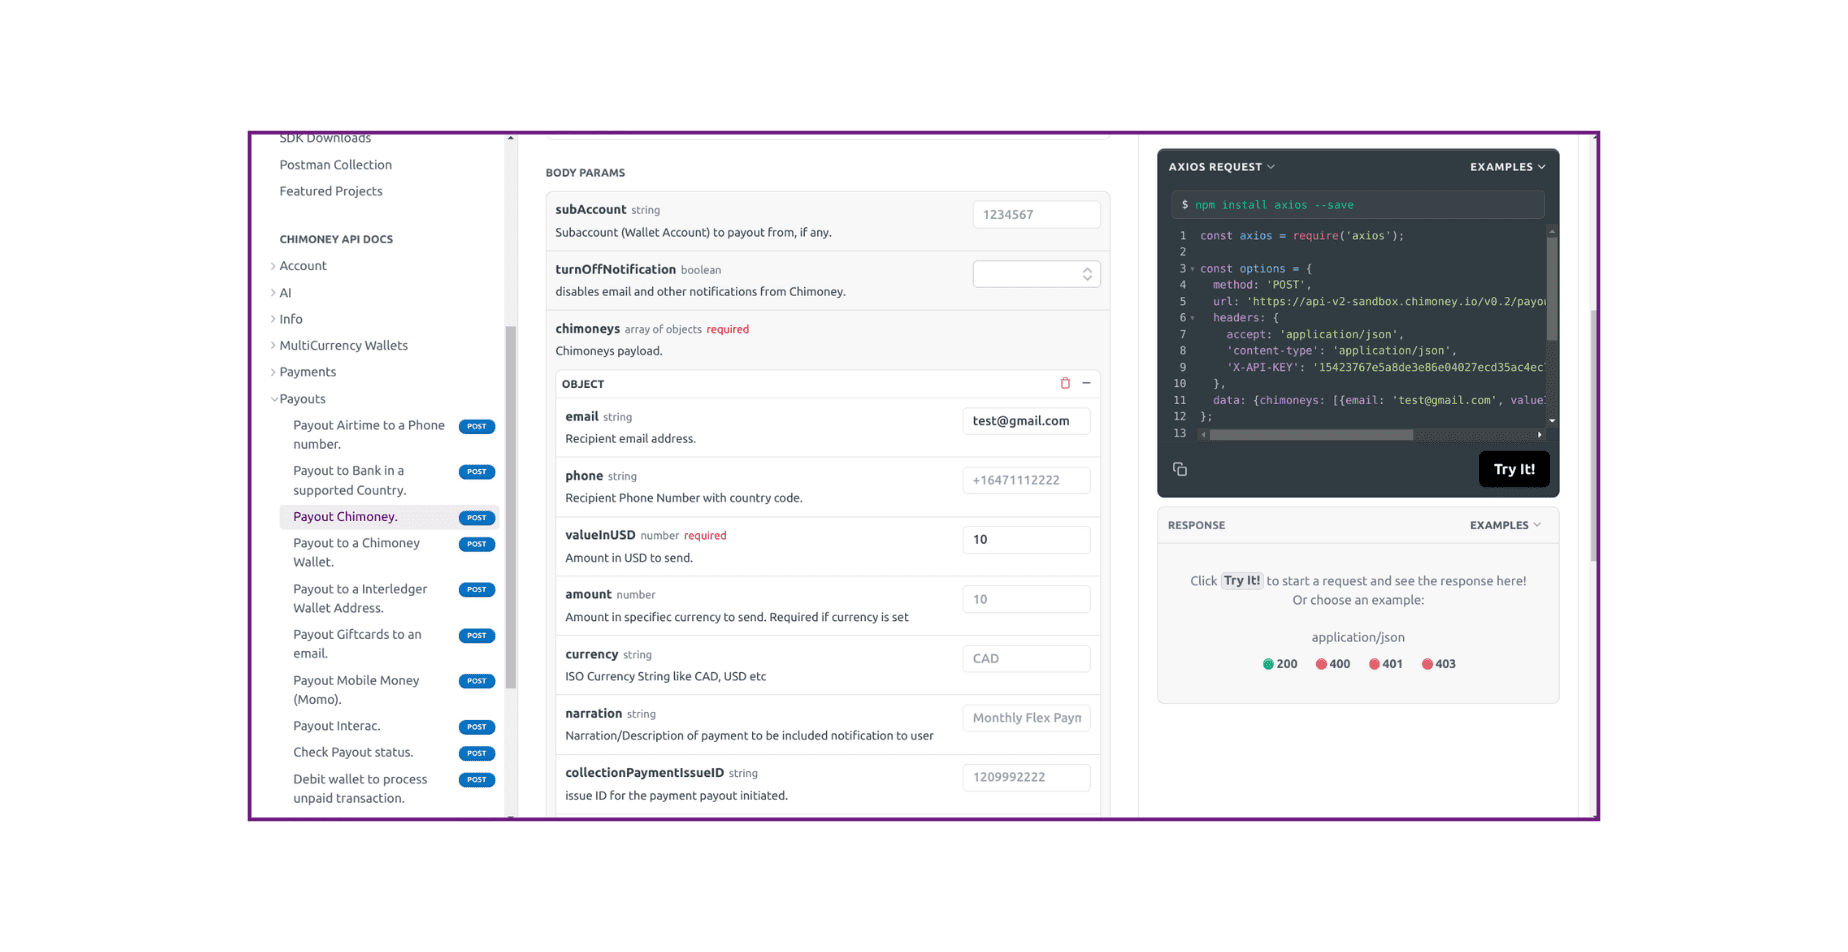
- Enter test details in the Body Params section;
Recipient email address,Amount in USD to send. - Click the "Try It" Button, this will send a request to the Chimoney API and generate an issueID.
- After clicking "Try It", the issueID will be generated and displayed in the output console. Copy the generated issueID.
Request Example
The code below makes a POST request to the Chimoney API using the Axios library in JavaScript. It sets up the request options in the options object and specifies the method as 'POST'. It provides the URL for the Chimoney API endpoint: https://api-v2-sandbox.chimoney.io/v0.2/accounts/issue-id-transactions. You will need to add your issueID at the end of this URL.
In the headers, include 'accept' as application/json, 'content-type' as application/json, and 'X-API-KEY' with your actual API key.
const axios = require('axios');

const options = {
  method: 'POST',
  url: 'https://api-v2-sandbox.chimoney.io/v0.2/accounts/issue-id-transactions?issueID= ' //Enter issueID,
  headers: {
    accept: 'application/json',
    'content-type': 'application/json',
    'X-API-KEY': ' ' //Enter your API Key
  }
};

axios
  .request(options)
  .then(function (response) {
    console.log(response.data);
  })
  .catch(function (error) {
    console.error(error);
  });
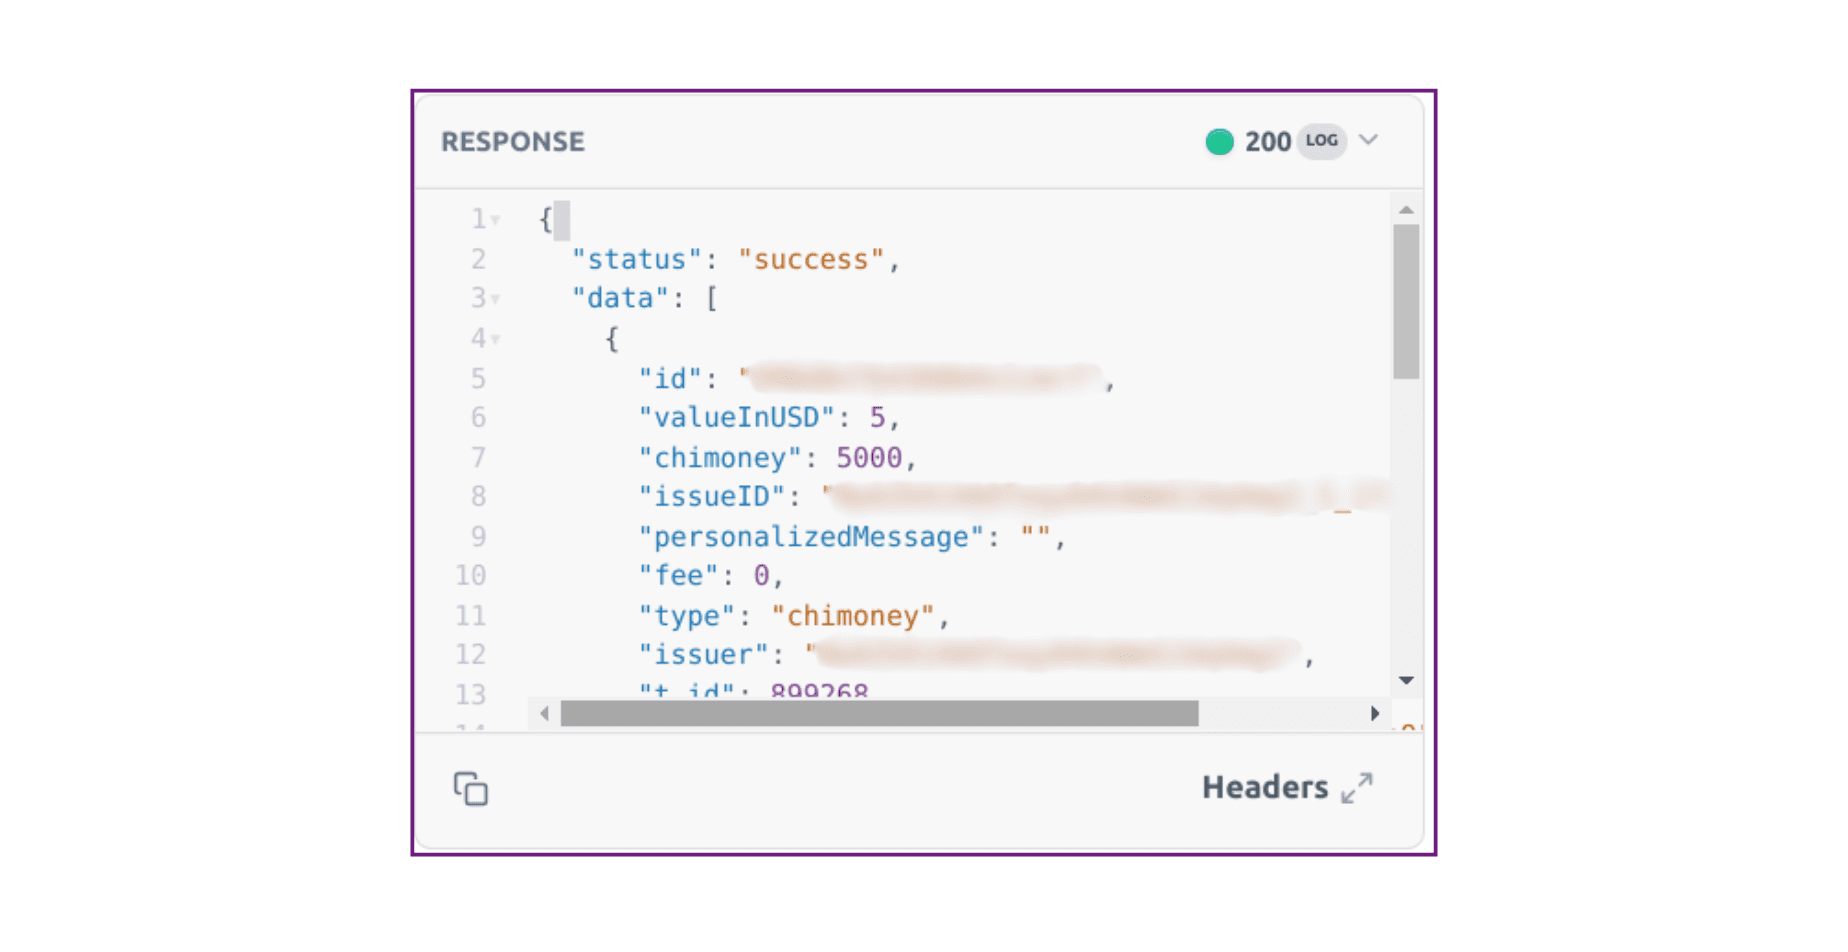
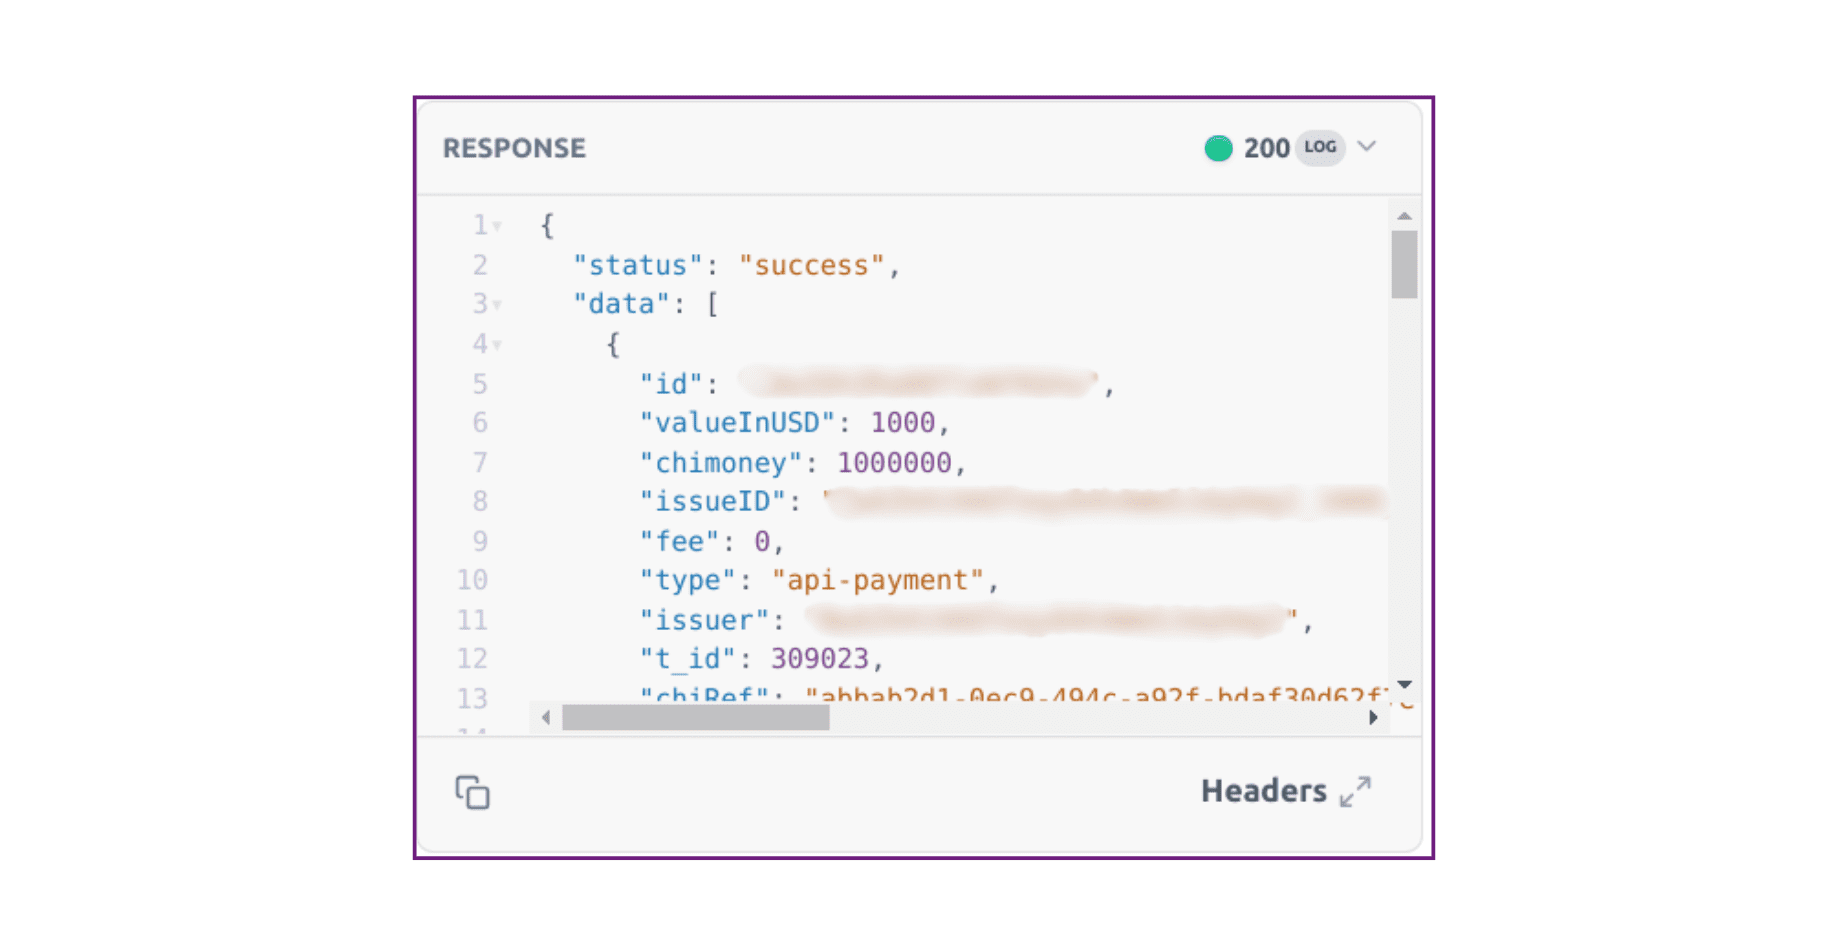
Sample Response
The response will include details of the specified transaction, such as the transaction amount, status, date, and any associated metadata.
2. Get Public Profile of a Chimoney User
Endpoint: POST /v0.2/accounts/public-profile
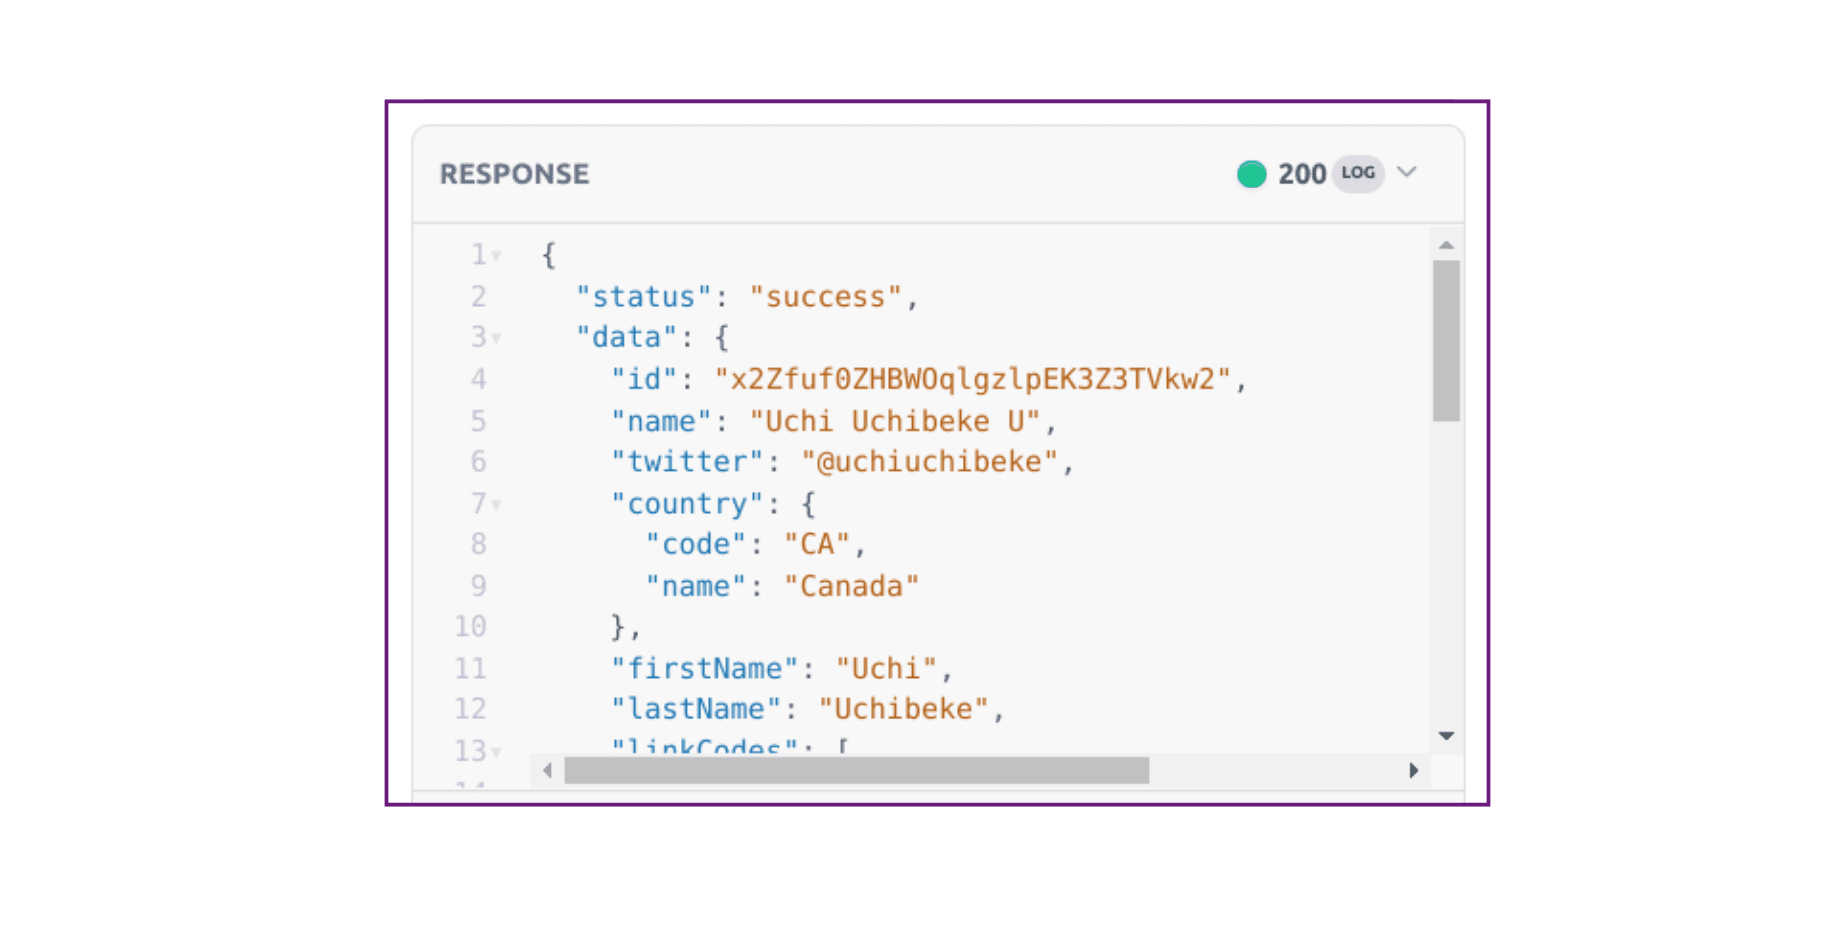
This endpoint allows you to retrieve the public profile information of a Chimoney user including social media links. Example public profile page
Application
- Display user profile information in your application.
- Build features that require user public information, such as user directories.
Request Example
Copy and paste the code below into your project where you need to make the API request. Replace 'user-id' in the data object with the actual user ID you want to query.
const axios = require('axios');

const options = {
  method: 'POST',
  url: 'https://api-v2-sandbox.chimoney.io/v0.2/accounts/public-profile',
   headers: {
    accept: 'application/json',
    'content-type': 'application/json',
    'X-API-KEY': '_YOUR_API_KEY_'
  },
  data: { userId: ' ' } //Enter userID
};

axios
  .request(options)
  .then(function (response) {
    console.log(response.data);
  })
  .catch(function (error) {
    console.error(error);
  });
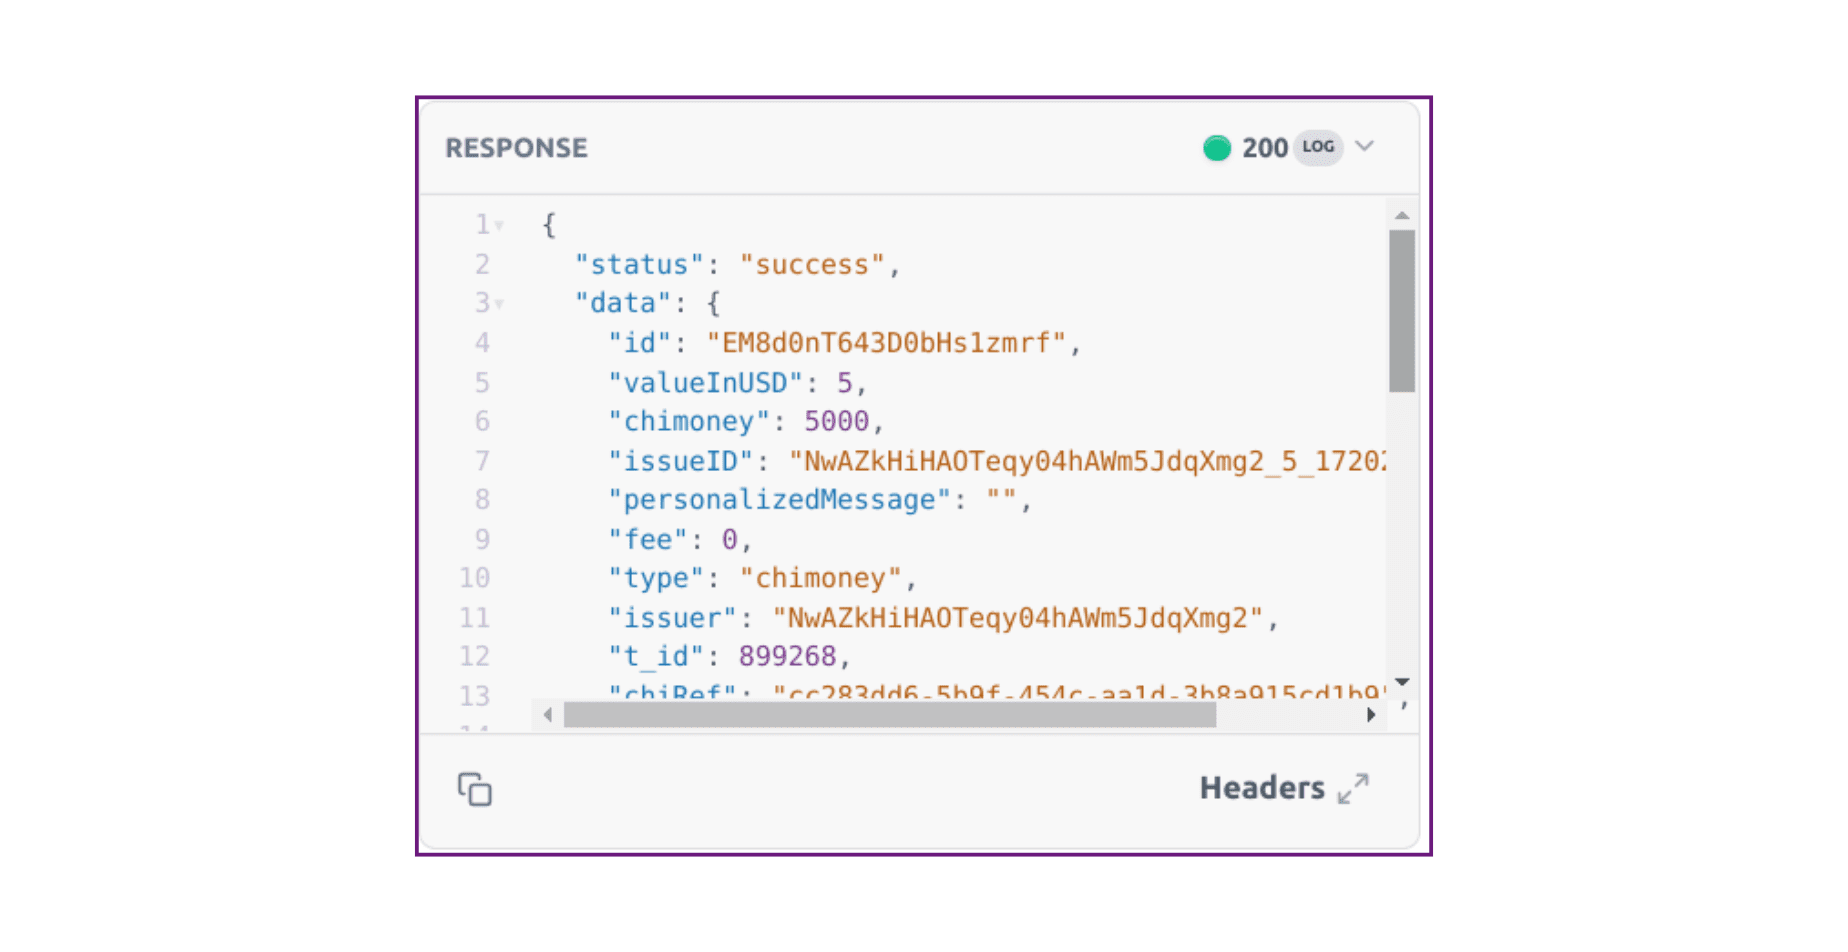
Sample Response
The response will contain the public profile information of the specified user, including their payment data, social media links , username and any other publicly available details.
3. Get All Transactions by Account
Endpoint: POST /v0.2/accounts/transactions
This endpoint allows you to retrieve all transactions associated with a specific account. This is useful for generating account statements or for reviewing transaction history.
Application
- Generate detailed account statements for users.
- Review all transactions linked to a specific account for auditing purposes.
Request Example:
Enter the accountID whose transaction details you want to retrieve.
const axios = require('axios');

const options = {
  method: 'POST',
  url: 'https://api-v2-sandbox.chimoney.io/v0.2/accounts/transactions',
  headers: {
    accept: 'application/json',
    'content-type': 'application/json',
    'X-API-KEY': '_YOUR_API_KEY_'
  },
  data: { accountId: ' ' } //Enter accountID
};

axios
  .request(options)
  .then(function (response) {
    console.log(response.data);
  })
  .catch(function (error) {
    console.error(error);
  });
Sample Response
The response will list all transactions associated with the specified account, including details such as transaction IDs, dates, amounts, and statuses.
4. Get Single Transaction Detail
Endpoint: POST /v0.2/accounts/transaction
This endpoint allows you to retrieve the details of a single transaction using its transactionID. This is particularly useful for verifying individual transactions and ensuring they were processed correctly.
Application
- Verify individual transactions to ensure they were completed successfully.
- Analyze the specifics of a transaction for reporting or troubleshooting.
Request Example
Enter the Transaction ID [t_ID] of the specific transaction whose details you want to retrieve.
const axios = require('axios');

const options = {
  method: 'POST',
  url: 'https://api-v2-sandbox.chimoney.io/v0.2/accounts/transaction',
  headers: {
    accept: 'application/json',
    'content-type': 'application/json',
    'X-API-KEY': '_YOUR_API_KEY_'
  },
  data: { transactionID: 'transaction-id' }
};

axios
  .request(options)
  .then(function (response) {
    console.log(response.data);
  })
  .catch(function (error) {
    console.error(error);
  });
Sample Response
The response will include detailed information about the specified transaction, such as the transaction amount, date, status, and any associated metadata.
5. Account Transfer
Endpoint: POST /v0.2/accounts/transfer
This endpoint allows you to transfer funds from one account to another. This can be used for various purposes such as internal fund transfers or sending money to another user within your application.
Application
- Facilitate transfers between user accounts within your application.
- Implement payment features that require transferring funds between accounts.
Request Example
Enter the recipient's ID for the person you intend to pay out to.
const axios = require('axios');

const options = {
  method: 'POST',
  url: 'https://api-v2-sandbox.chimoney.io/v0.2/accounts/transfer',
  headers: {
    accept: 'application/json',
    'content-type': 'application/json',
    'X-API-KEY': ' ' //Enter _YOUR_API_KEY_
  },
  data: {receiver: ' '} //Enter the recipient's ID
};

axios
  .request(options)
  .then(function (response) {
    console.log(response.data);
  })
  .catch(function (error) {
    console.error(error);
  });
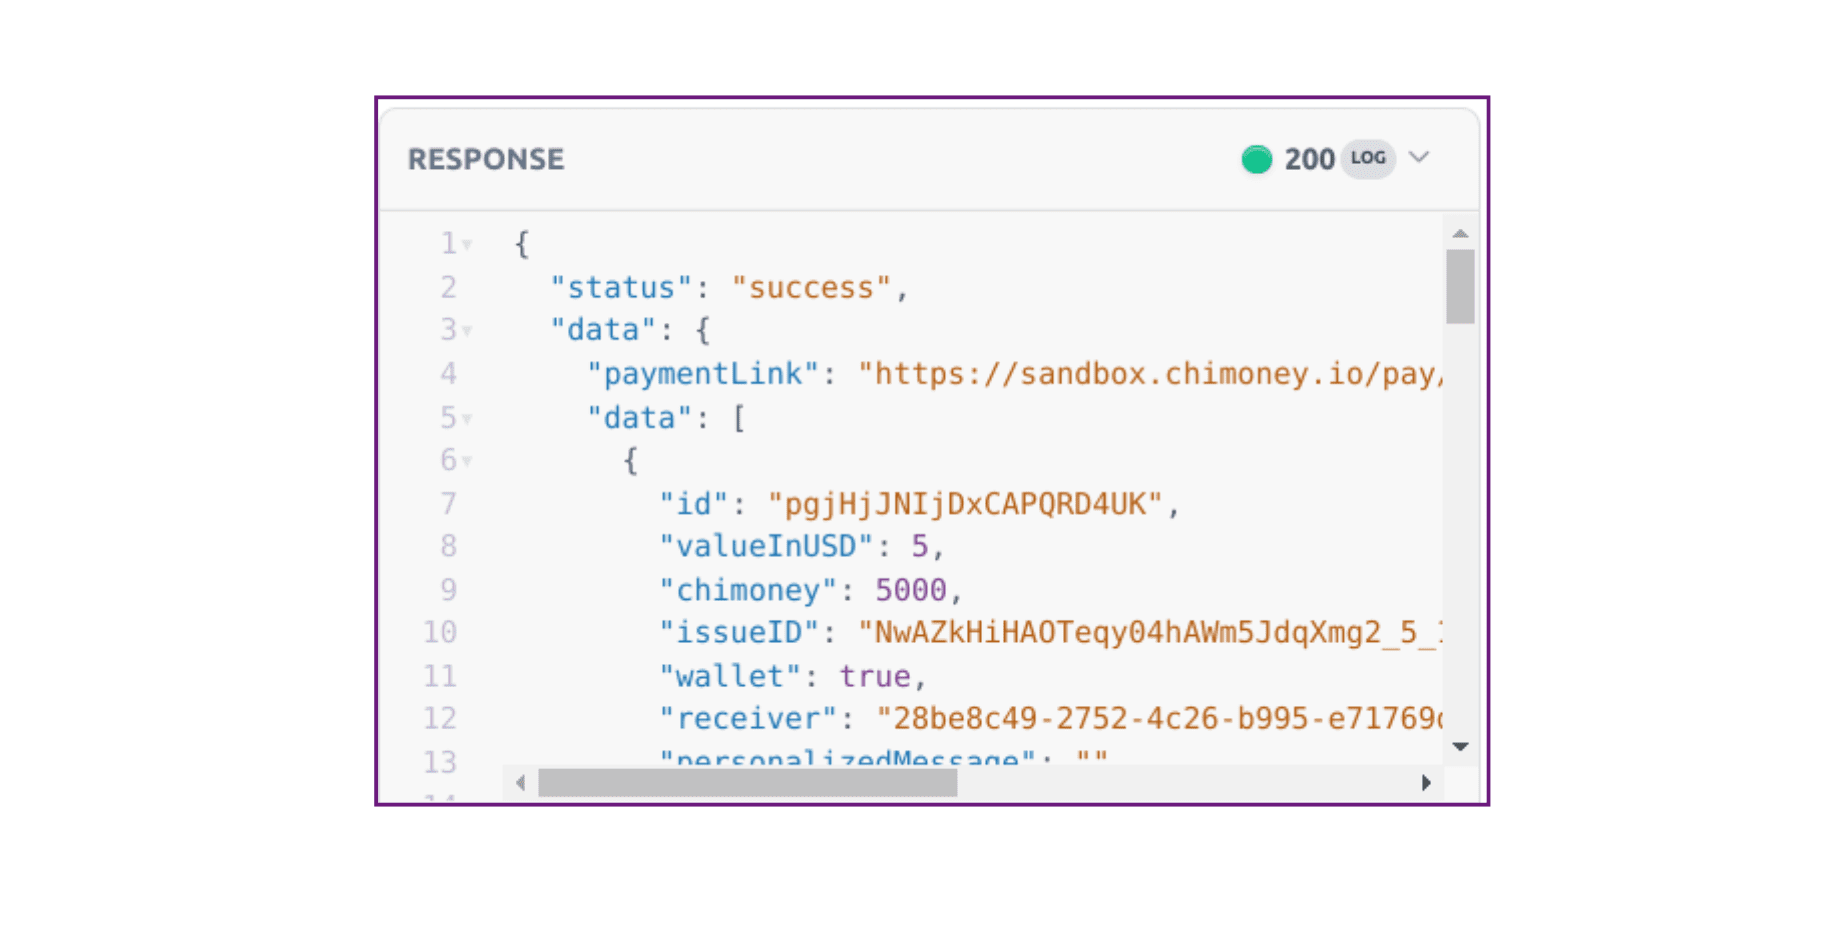
Sample Response
The response will confirm the successful transfer of funds between the specified accounts, including details such as the payment link, redeem data, status, transfer amount, payment date.
6. Delete an Unpaid Transaction
Endpoint: POST /v0.2/acconts/delete-unpaid-transactions
This endpoint allows you to delete an unpaid transaction using its transactionID. This is useful for cleaning up pending transactions that were not completed or need to be canceled.
Application
- Clean up unpaid transactions.
- Cancel transactions that were initiated by mistake.
Request Example
const axios = require('axios');

const options = {
  method: 'DELETE',
  url: 'https://api-v2-sandbox.chimoney.io/v0.2/accounts/delete-unpaid-transaction?chiRef= ', //Enter  chiRef ID
  headers: {
    accept: 'application/json',
    'X-API-KEY': ' ' //Enter YOUR_API_KEY
  }
};

axios
  .request(options)
  .then(function (response) {
    console.log(response.data);
  })
  .catch(function (error) {
    console.error(error);
  });
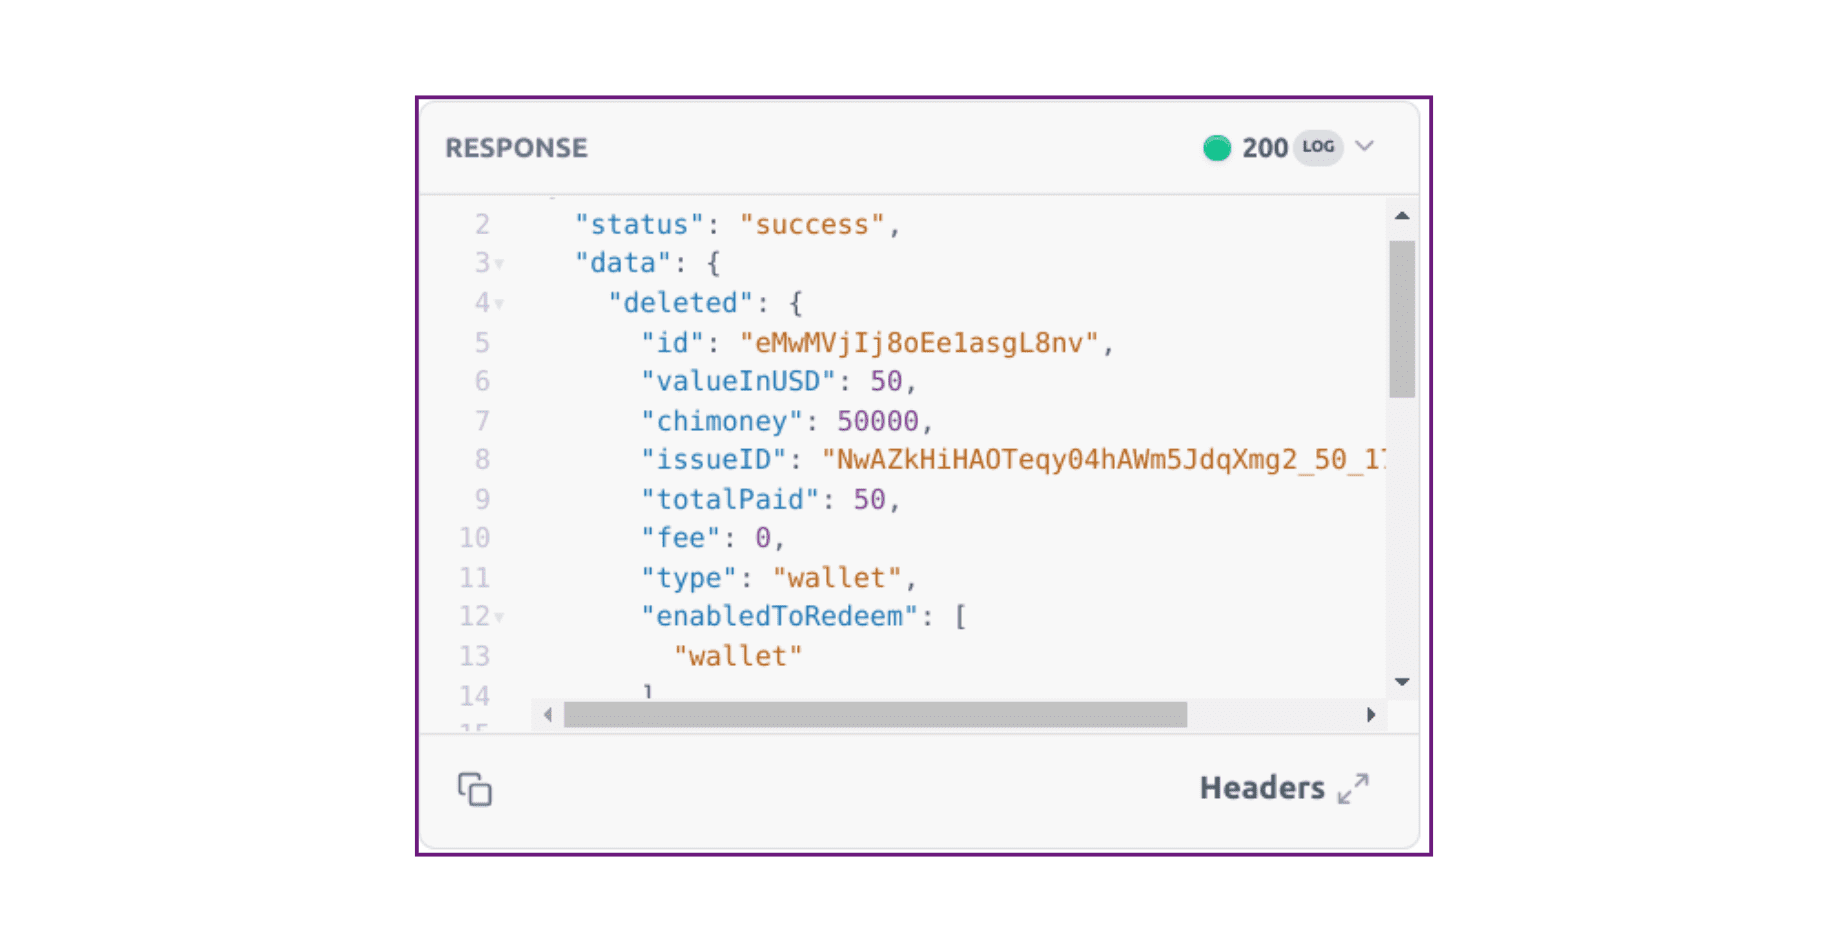
Sample Response
The response will confirm the successful deletion of the specified unpaid transaction, ensuring that it is removed from the transaction history.
Conclusion
By following the provided examples and explanations, you should now be able to integrate these Chimoney Accounts endpoints into your application easily.
Stay tuned for the next article in this series, where we will explore the AI endpoint of the Chimoney API. If you have any questions or need further assistance, please reach out to us at support@chimoney.io.
Happy coding with the Chimoney API!
Check out these other posts

Why 2025 Is The Year AI Agents Get Their Own Wallets (And Passports)